On Tuesday, September 26, we had our first Share 2 & Critique in class, where each of us students shared two of our own photos we've taken within the semester, and received tips, tricks, and guidance for either composing a better picture or how to use Lightroom to make our photos even more appealing.
This week for my blog post, I tested out Lightroom with the two photos I shared with the class to see if I could make these photos look better than how they were originally captured. A lot of the edits came from suggestions given during the previous class session, but how they turned out very much depended on my pickiness as well as the lighting of my HP laptop.
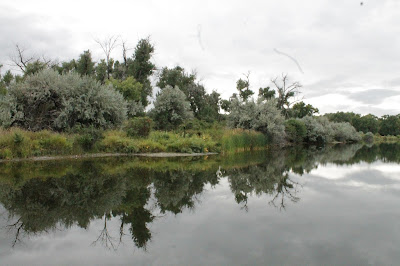
First Image Before & After:
 |
| ISO 1600 | 32mm | f/20 | 1/400sec |
 |
16 x 9 Crop | Contrast +10 | Highlights - 10 | Whites +10 | Clarity +20 | Vibrance +20
Saturation +10 | Hue: Green +25 Saturation: Green +10 | Saturation: Blue +10 |
Additional things I played with to enhance this photo were the adjustment brush under the clouds rolling in, and the spot removal to specifically clone out some dust spots from my camera in addition to some distracting ducks in the water, cars off in the background, and to "camouflage" a parking lot in the distance. I tried to make the greens stick out as much as possible without making the color look too weird. Because it was kind of stormy the day I took this photo, I really just wanted to make sure the colors and the mood of the afternoon spent at Riverfront Park really stood out in this photo.
Second Image Before & After:
 |
| ISO 6400 | 18mm | f/22 | 1/640sec |
 |
| Treatment: Black & White | Clarity +20 | Black & White Mix | Luminance 10 | Contrast 15 |
For this photo, it was more challenging to remove the dust spots because I used the graduated filter to help bring out the details in the clouds as well as the reflection of the clouds. So, if I wasn't careful, you could still see the outline of the dust spots that were once there. It was also difficult to make the trees as dark as possible without losing detail. On my laptop screen, I could still see some detail in the trees after I played with the contrast for a bit. I didn't do a whole lot of cropping with this photo - I just brought it in a little bit from the left to remove a random branch coming in from the edge.
Overall, I think using Lightroom was pretty straightforward, especially after I was able to save a preset so I could start working on my photos from a better quality from the beginning. On my laptop, these photos seemed to turn out good, or at least in a way I liked them without trying to mess with them to much. Hopefully on a different screen or printed off they won't be terrible. If they do turn out terrible, at least Lightroom lets me pick up where I left off, or, if need be, I can just start over with the original and go through the process again to morph the photos into something better.


No comments:
Post a Comment